

cybersecurity
cybersecurity
—
Creating a SiEM Platform
Creating a SiEM Platform


industries
industries


Creating a SiEM Platform
—
min read
Creating a SiEM Platform from Scratch using Wazuh-ELK Stack
At Netcon, we constantly experiment with technologies that enhance our security service capabilities to our clients. One of our current experiments is building a Security Information and Event Management (SiEM) platform using Wazuh-ELK stack. Since we were building this from scratch, solutions for challenges we faced were not readily available. In this blog series, we share our experience on the different challenges we faced and how we overcame them.
How to Integrate Fortigate Firewall with Wazuh-EK stack on AWS
One of the primary challenges we faced in our experimentation with Wazuh-ELK stack was while integrating it with the Fortigate Firewall network device. The Wazuh-ELK technology is fairly new in the security industry, and hence not much information is readily available on this specific topic. Considering the cost-efficiency of Wazuh-ELK, it’s only going to increase its popularity. So, someone else will most likely face the same challenges that we did. While the Wazuh community is very supportive in helping with solutions, the information is all over the place. Therefore, we wanted to share this step-by-step process on this topic.
We faced multiple challenges during our experimentation, which included anywhere from simple fixes of editing configuration files to more complex fixes of creating a site-to-site tunnel. The following steps are listed based on the sequence of how we should carry it out to reduce the number of errors and successfully integrate the device.
Step 1: You need to have the right configuration on the ossec.conf file for syslog connection. The location of the file is usually in /var/ossec/etc/ folder. But it could be different based on where you installed it.
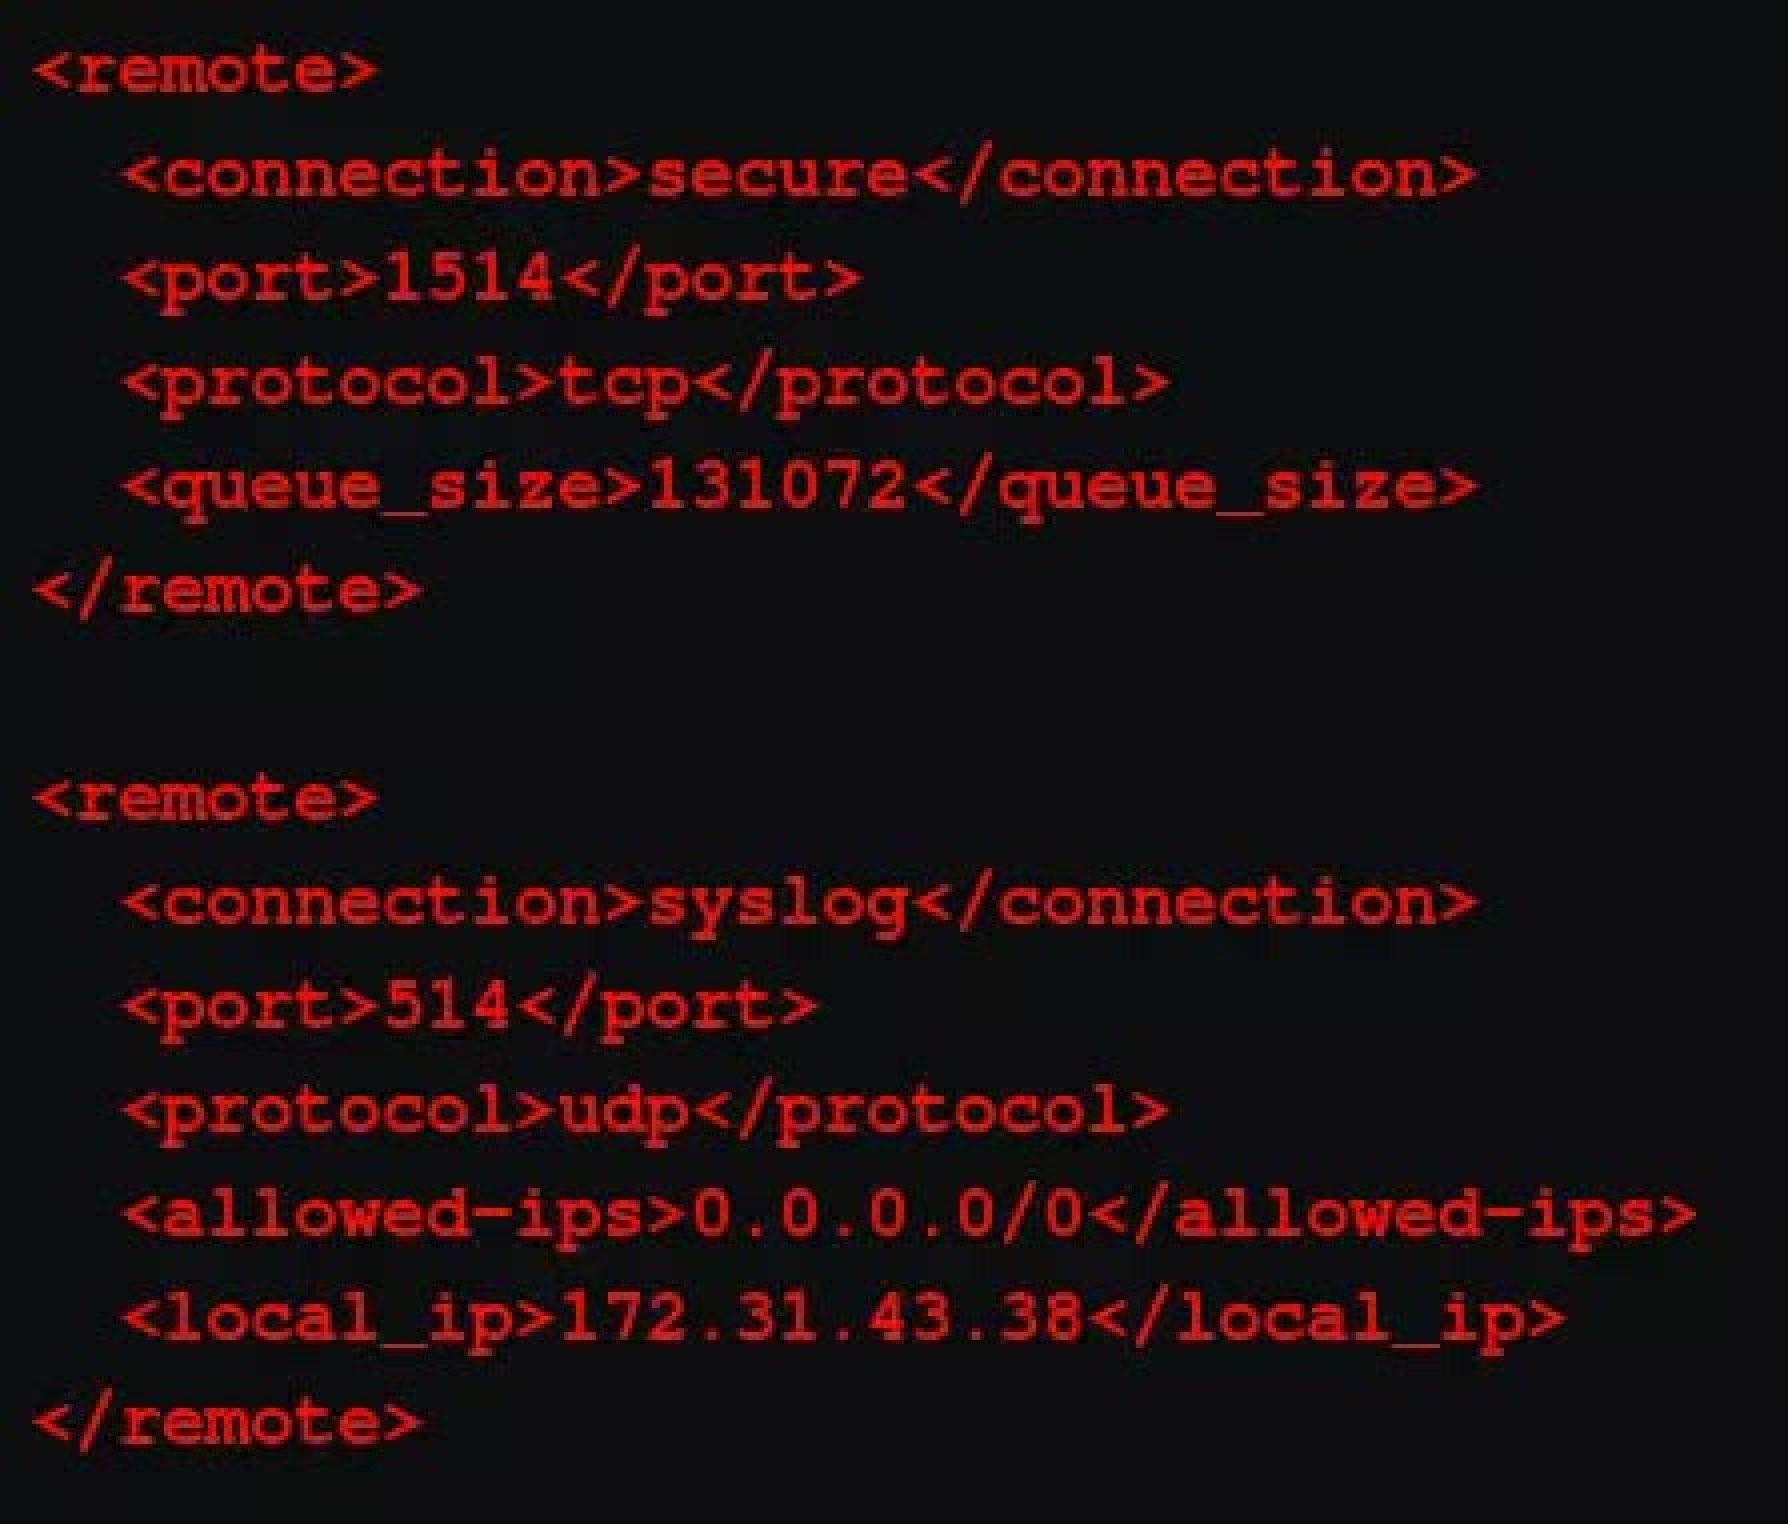
In the ossec.conf file, you need to edit the configurations under syslog. This part is for network devices. The configuration should account for the following factors:
514 – This part of the configuration specifies which port receives the logs on the manager’s system. By default, its 514 for syslog.
udp – This part ensures which protocol your firewall logs are being forwarded from. You can have either tcp or udp.
– You need to specify which IPs should be allowed into the Wazuh-manager. By default, it doesn’t have any or even include the tag. You must add the tag and specify the IP.
– You need to add the Wazuh-manager’s IP here.
Here’s the code that you can directly copy-paste into the conf file.
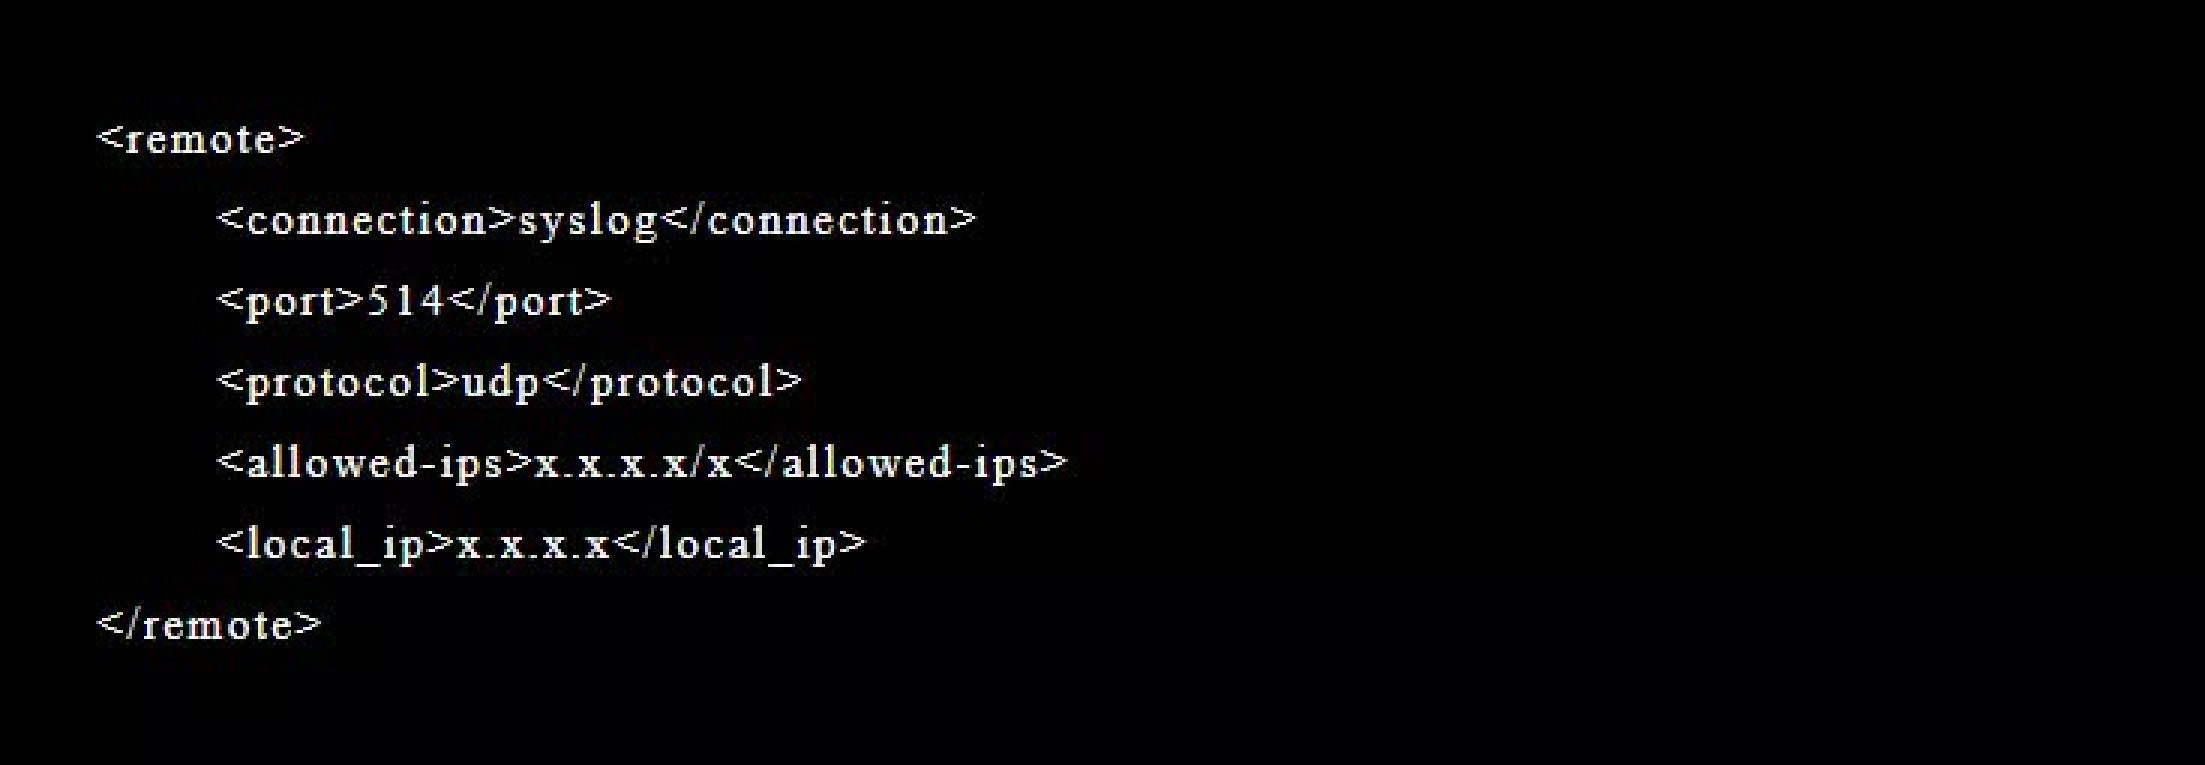
Once you’ve edited the conf file, it should look like the image on right. So, make sure the indenting is right. Now restart the Wazuh-manager.
Okay, now that the Wazuh-manager is setup for receiving the firewall logs, you need to set up the Fortigate firewall to send logs.
Step 2: Change the Settings on the Firewall Device to Forward System Logs
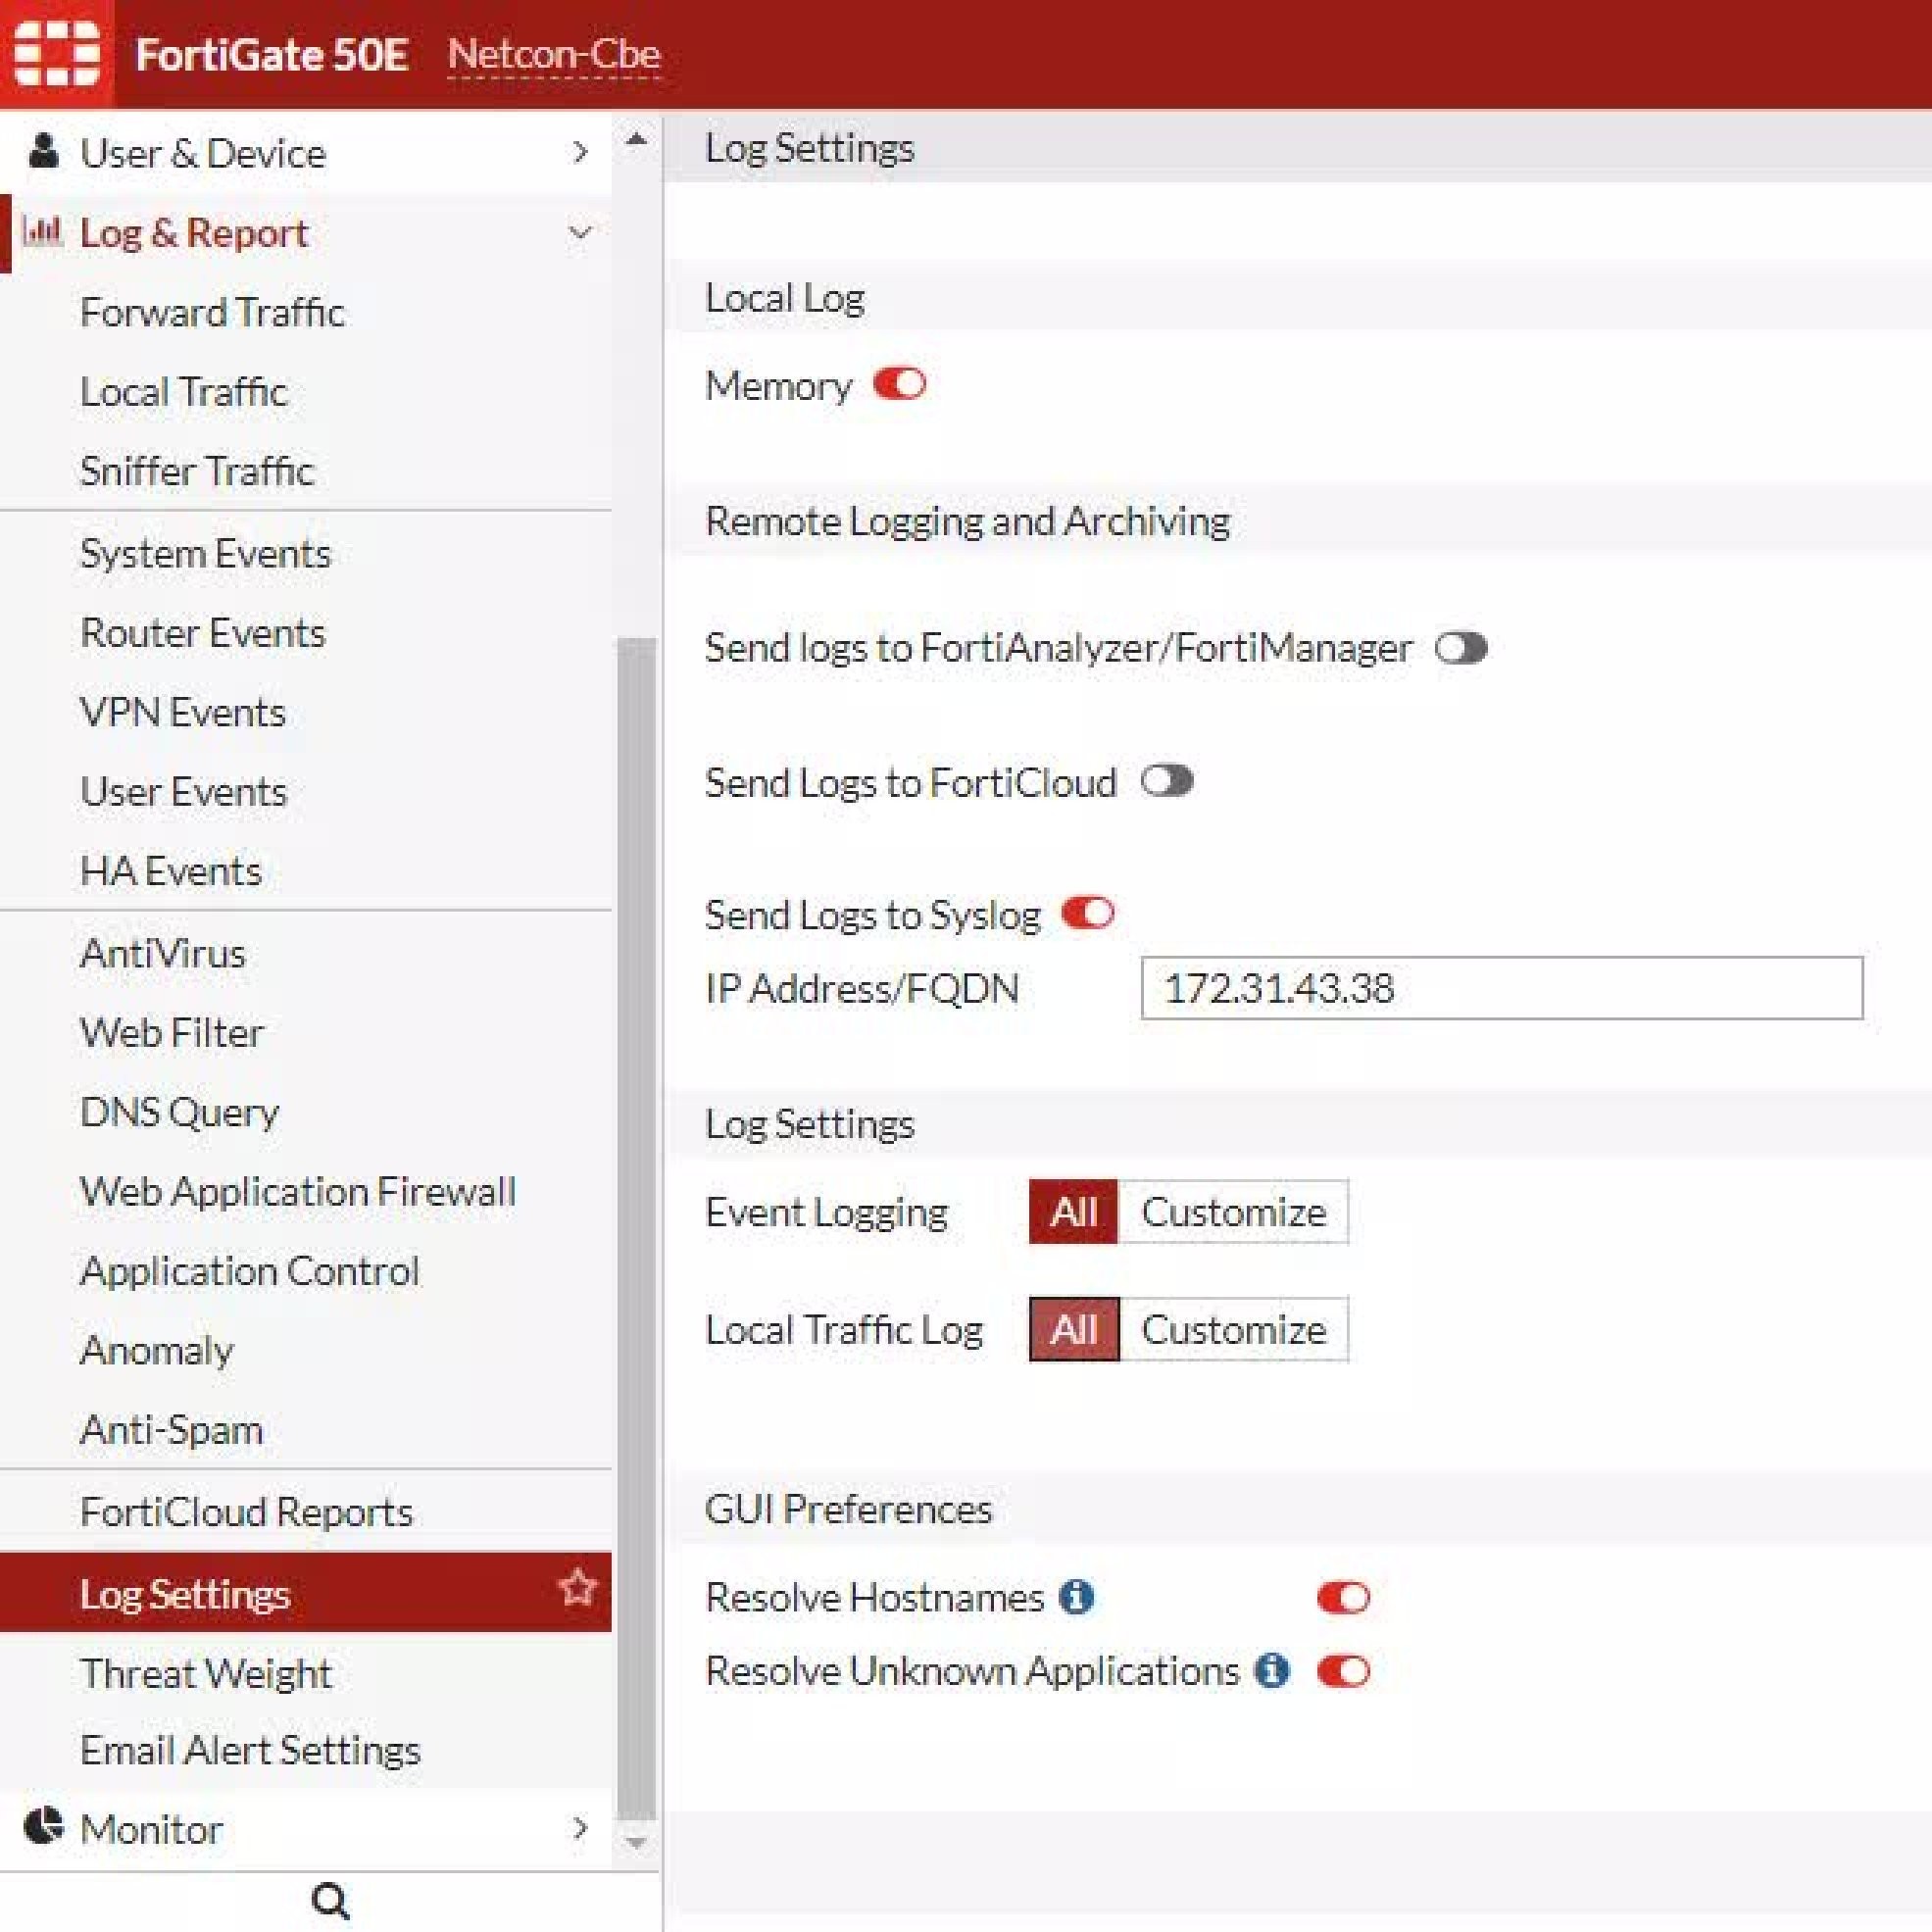
This part is fairly easy for any network devices. Under logging part of the settings, change the logging location to remote. This will give you the option to enter an IP address. Then, make sure you have the following accounted for:
1. Add the Wazuh-manager’s IP to forward the logs.
2.Assign same TCP/UDP configuration as you specified in Step 1; ossc.conf file. If you don’t have an option for it, then it’s most likely UDP. After completing the steps, it should look somewhat like the image on the right.
Step 3: Create a Site-to-site Tunnel
After steps 1 and 2, your logs should be flowing to the Wazuh-manager. The logs are freely flowing through the internet, which is not ideal considering it’s a security tool. Hence, to secure the logs properly, we had to create a site-to-site tunnel.
Note: Site-to-site tunnelling is a private communication channel to ship the logs privately from the device to the manager.
This is the most challenging part of the whole process. You’ll probably face the same challenge if you are hosting it on any cloud server for continued access. We hosted it on AWS, so this step of the blog is specific to AWS. Below are the five steps that we took to successfully complete this device linkage.
3.1. Create a Customer Gateway – Customer gateway is the first step to creating a Site to Site tunnel between your remote networks to cloud. Here, we define the details of which network our Wazuh-manager is connecting to. You can find more details on how to do this at: [AWS.Amazon.com](https://docs.aws.amazon.com/vpn/latest/s2svpn/SetUpVPNConnections.html#vpn-create-cgw).
3.2. Create a Virtual Private Gateway – Next, you need to configure the Target Gateway in AWS. There are two types of Target gateway – Virtual Private Gateway and Transit Gateway. You can find more information on which Gateway you need at: AWS.Amazon.com
3.3. Enable Route Propagation in your Route Table – Now that we have gates on both ends, we need to configure the route table to include the routes used to travel between both gateways. Check out AWS.Amazon.com for more details.
3.4. Create a Site-to-Site VPN Connection – In steps 3.1 to 3.3, we created and configured the necessary components to set-up a site-to-site connection. In this step, we set up the actual tunnel by linking the previous components. Follow the steps from AWS.Amazon.com to suit your requirements. After completing the steps, don’t forget to download the configuration file. This file has the necessary configurations that you need to add to Fortigate.
3.5. Configure Fortigate Firewall with VPN Details – Now that the site-to-site vpn is setup, you need to configure the firewall to match with the configuration file you previously downloaded. This is another challenging step in the whole process due to two main reasons.
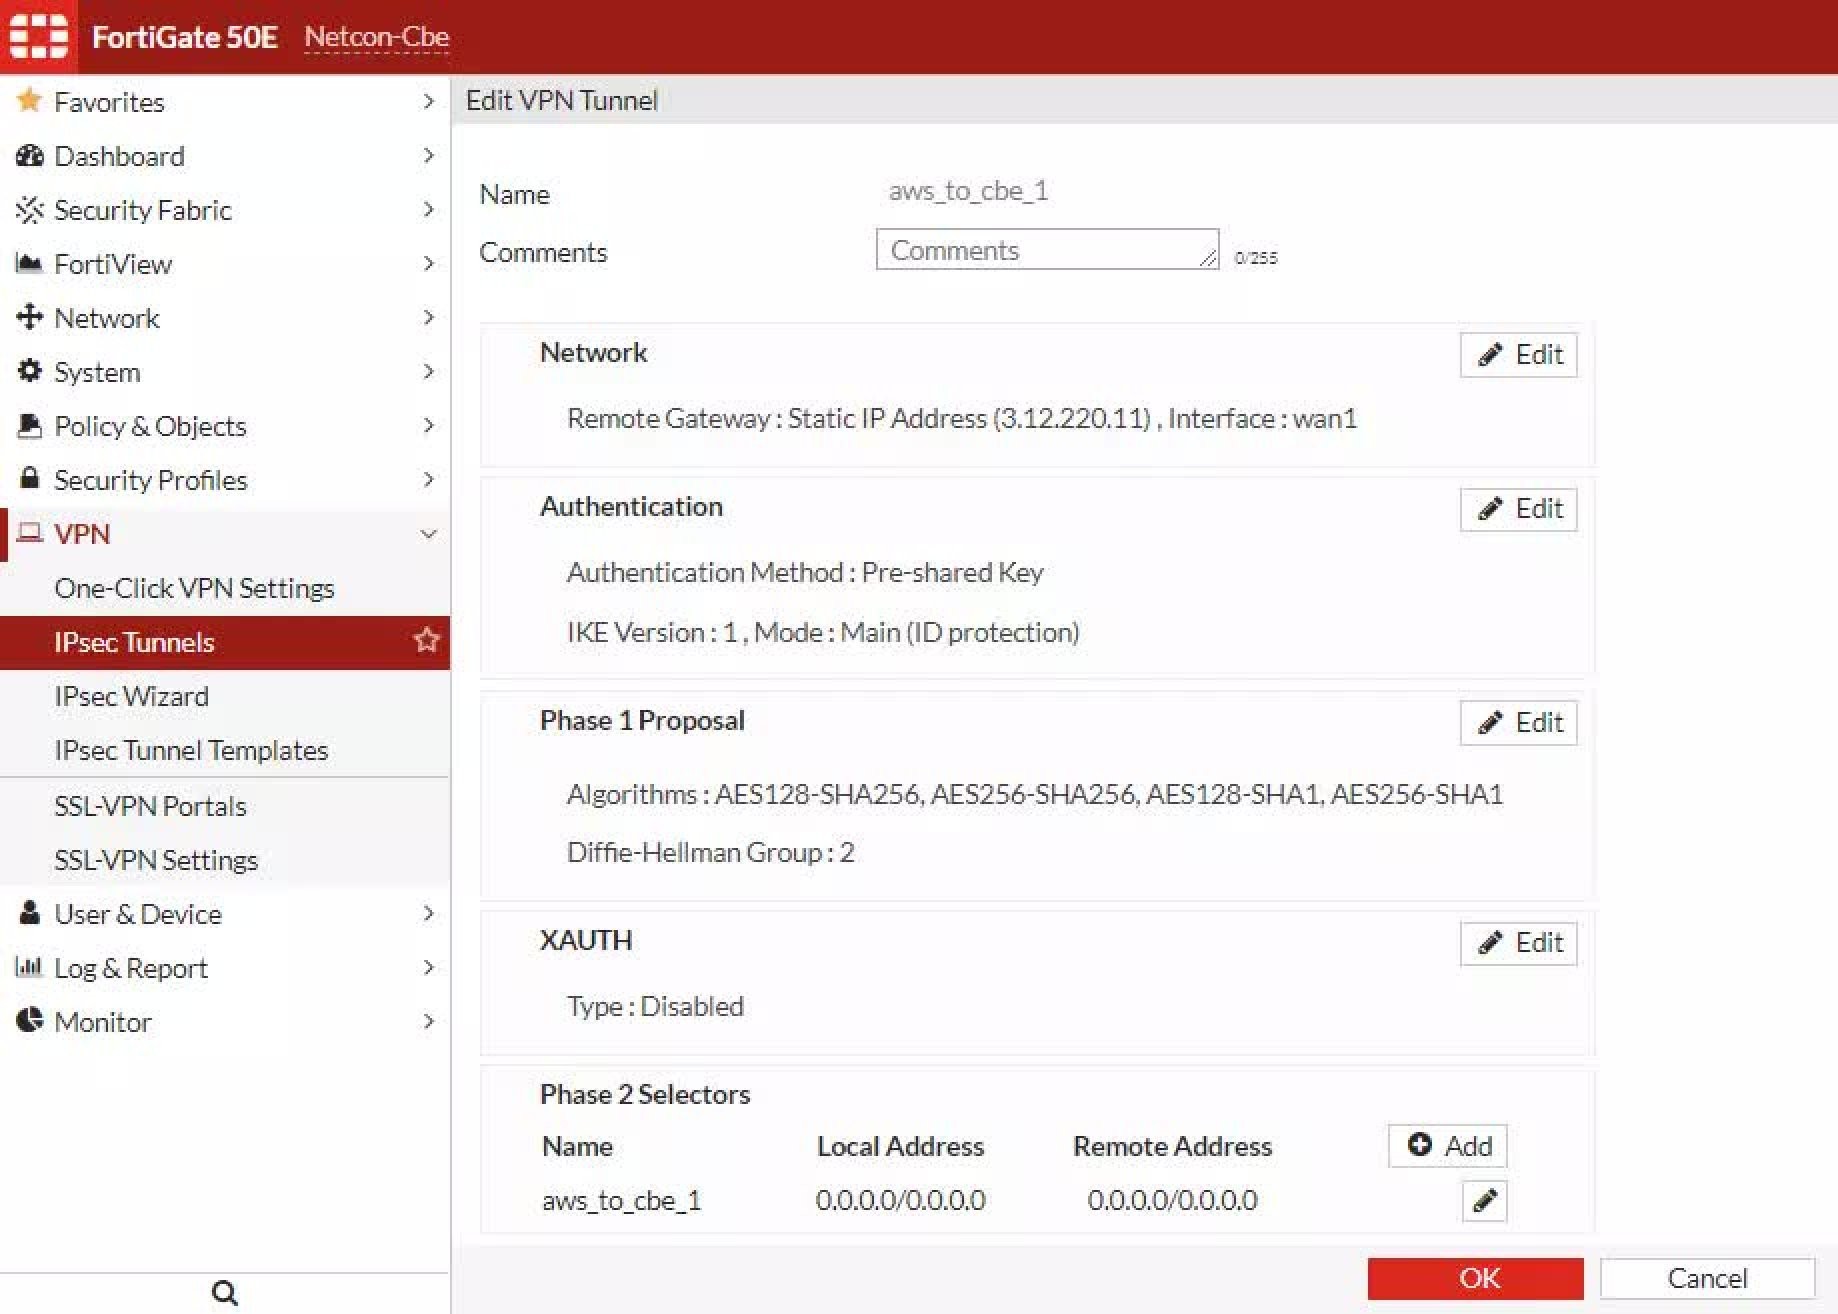
The configuration file that we got from AWS in the previous step had 10.0.0.0/18 as the private IP (LAN) segment. You need to correct it with your private IP segment. In addition, the private IP and public IP (WAN) should match in both the configuration files and the Fortigate VPN details. After doing this, check if it looks somewhat like the image on the right.
The AWS default interface is composed of 15 random characters, but Fortigate firewall only supports 12 characters. So, it is better to change the name of the interface to your device name. To do so, in your Fortigate console monitor, find the VPN Monitor section and select Ipsec tunnel. Then, select BringUp and ‘All phase 2 Selectors’. Here, you have the option to change the interface name.
That’s it. The connection is now established. The logs are securely transported from the firewall to Wazuh-manager through the secure tunnel. The logs should be reaching the manager on port 514. You can confirm that by running a tcp dump on the network flow on the manager system.
But don’t celebrate yet, we still have work to do. However, the next few steps are relatively easy.
Step 4: Decoding
Once the logs reach the manager’s system, the Wazuh-manager captures them and saves them into archives before sending them through decoders. The purpose of a decoder is to take the raw logs and convert them into structured information. The Wazuh-manager, unfortunately, was not decoding our logs, despite having a decoder for this in the default decoders folder. After banging our collective heads, we figured that we are better off creating our own.
There are two ways you can write the decoder, but you should use regex (regular expression) for it. One way is to include all regex in one bit of code. Refer to the image.
The other way is to have single sibling for each parameter, also known as sibling decoders. Refer to the image.
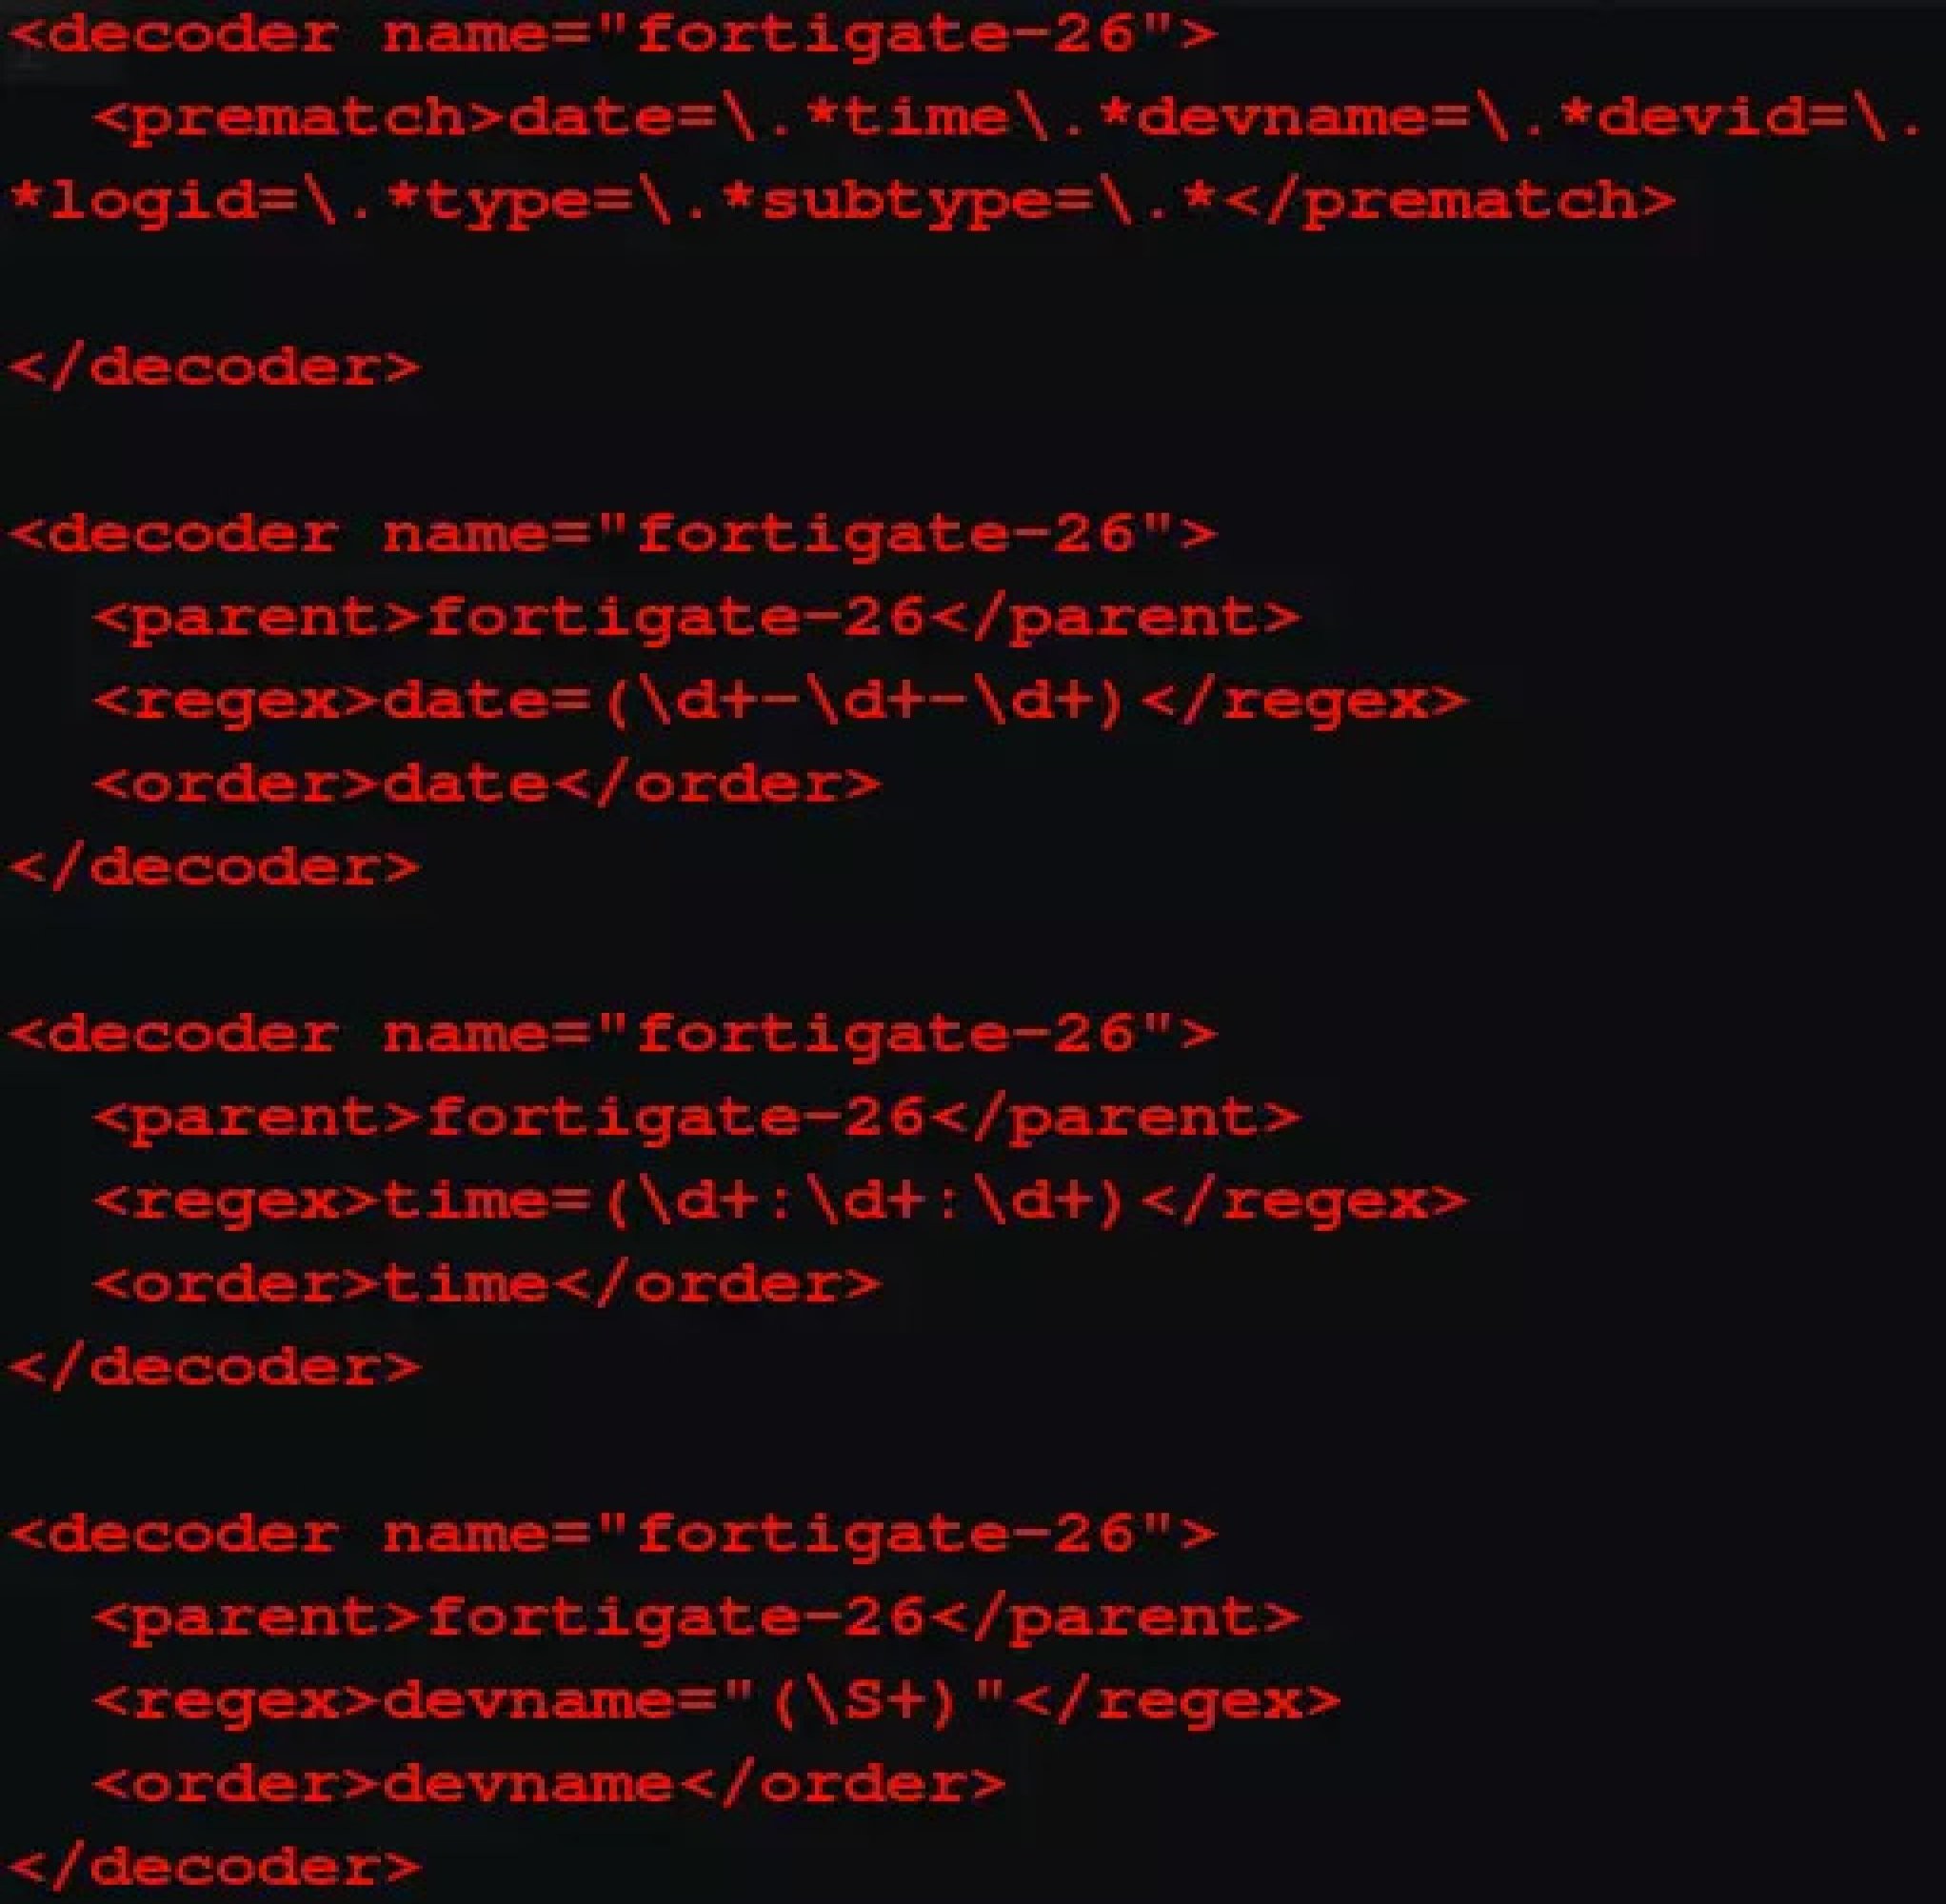
The logic of how the decoder works is: When the log reaches the Wazuh-manager, the prematch is what’s used to qualify which decoder will be used for that log. If a log has content that meets the prematch condition, the decoder name is assigned to the log and sent through the rest of the decoder. Each parent pulls its respective data from the log and presents it in the decoded format of the log.
Having multiple parents is a more robust solution than the former one, because in case a log does not contain a data field or the regex does not match a custom field, such as “policy name”, it is unlikely to work.
Step 5: Rulesset
After decoding, ensure the rules trigger the necessary alerts. This is a continuous task, but this is what differentiates a good SiEM tool from an average one. Create new rules so that the manager triggers alerts for new threats.
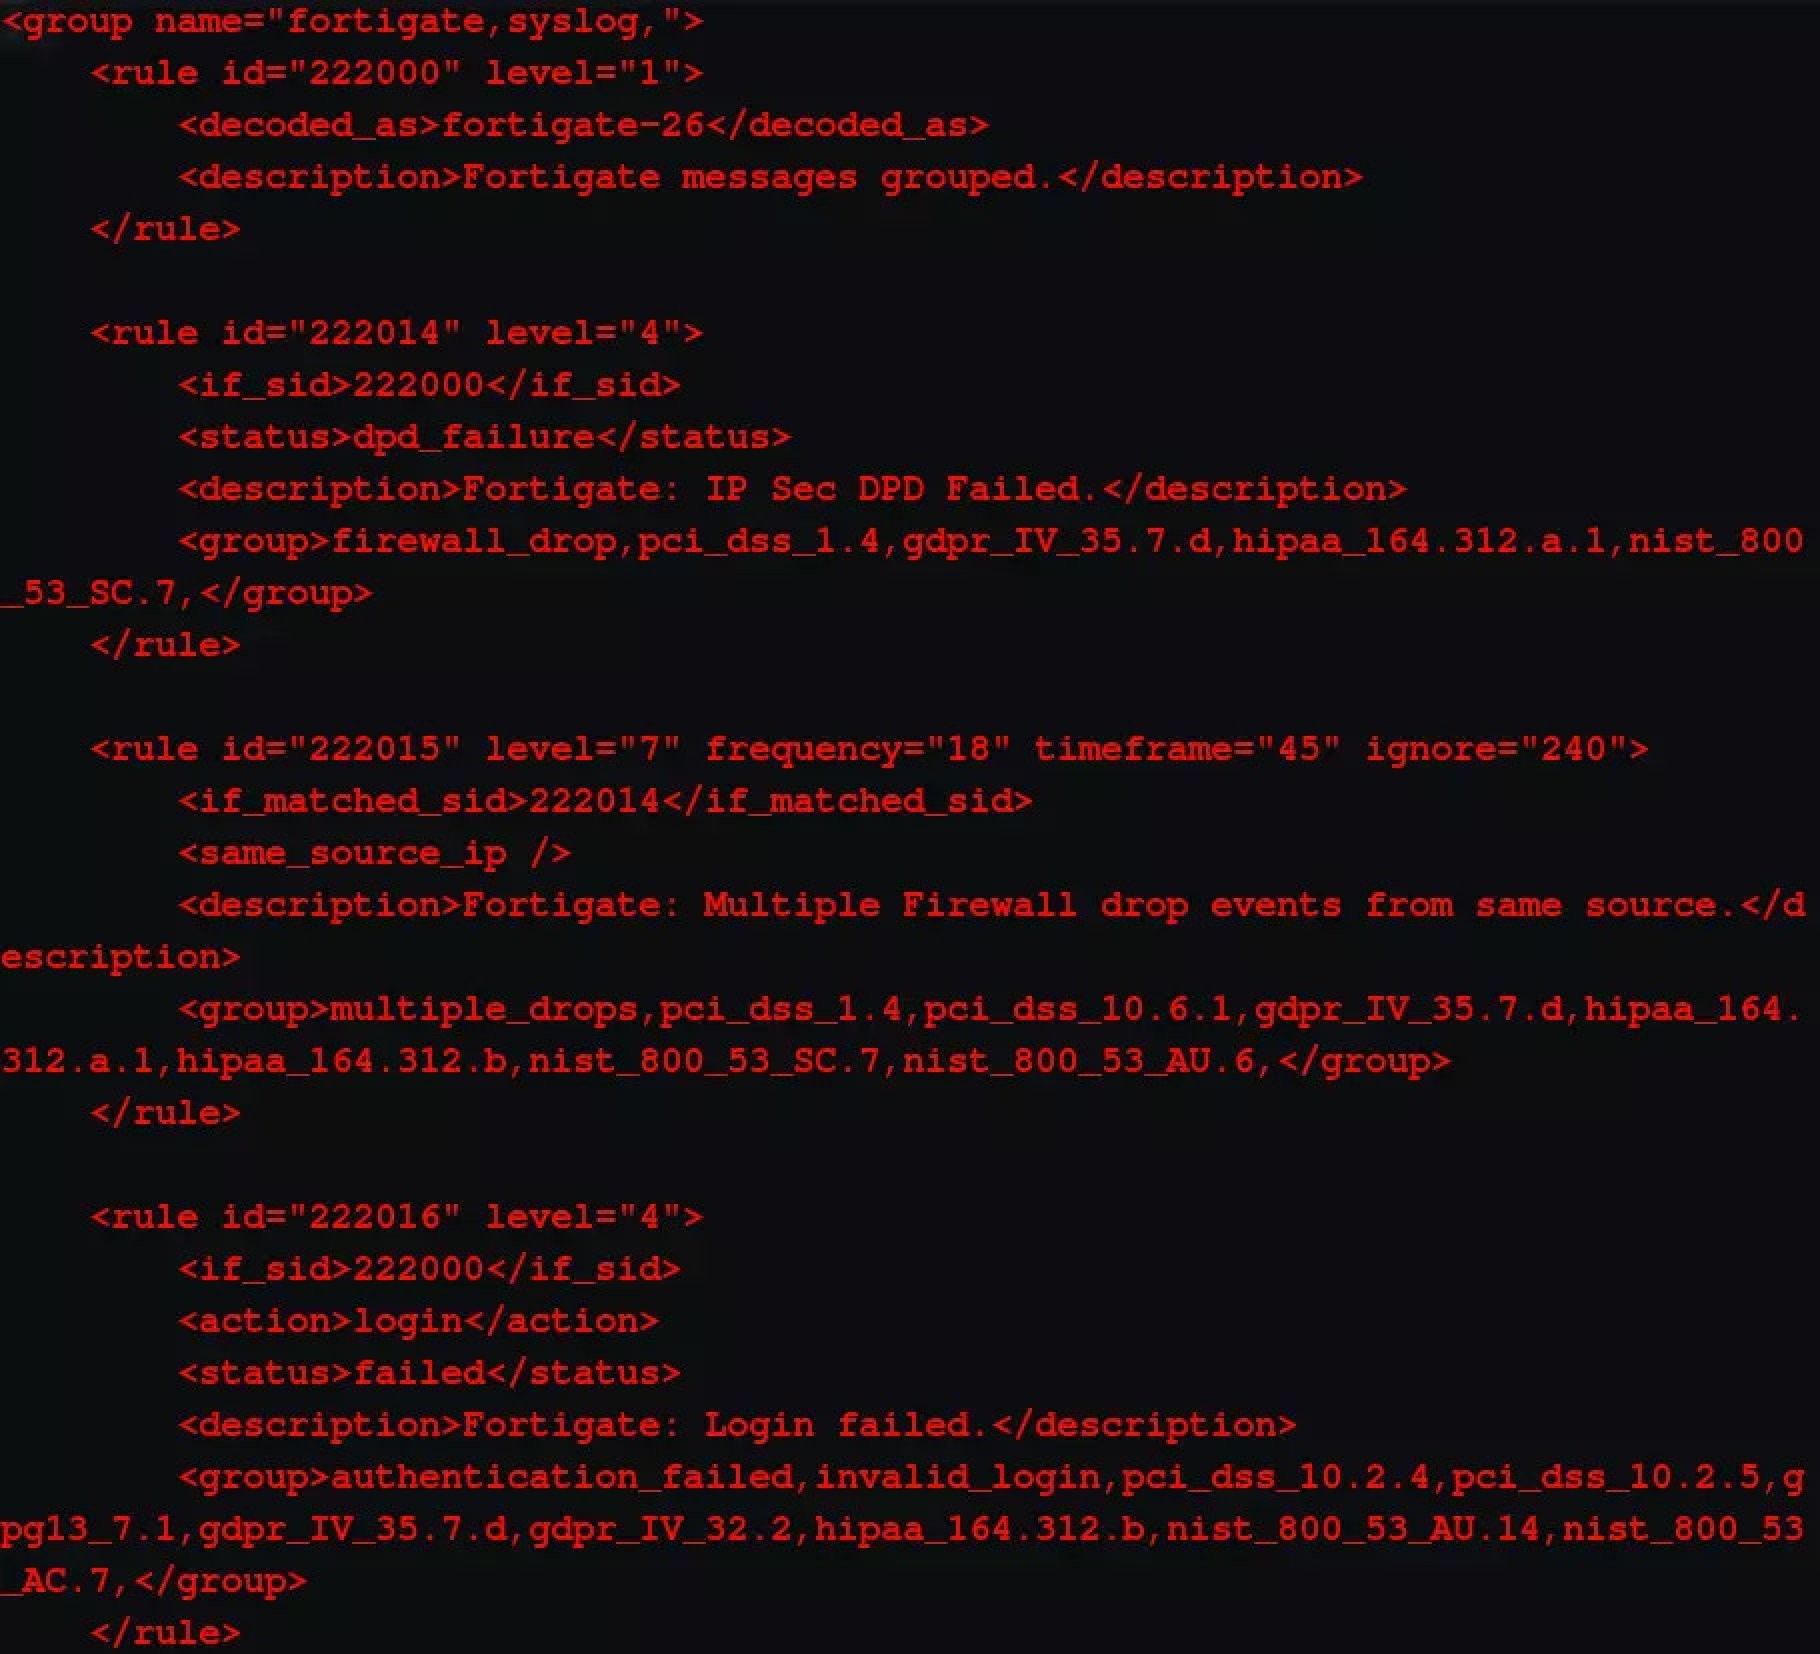
For that, you need to understand the logic and linkage of rules with the respective decoder. The image on the right shows part of the rules that processes logs from the Fortigate firewall. In the first bit of code, the Fortigate-26 part is the if-condition that links the decoder to these set of rules. If this condition is met, the logs are processed per each rule in the set. If the logs meet the conditions of any one of the rules, an alert is triggered and sent to elasticsearch.
Step 6: Access the Logs on Kibana
As the log alerts are triggered, filebeat picks up the logs and sends it to elasticsearch. Here, ensure the filebeat yml file has the right configuration so that the logs are reaching Kibana. Once the logs reach elasticsearch, you should be able to query it on the Kibana dashboard under ‘discover’ tab using the Wazuh-alerts template.
Fortigate firewall was the first device we attempted to integrate with Wazuh-manager. If you follow the steps in this blog, you’d know by now how challenging it was. Especially, when there is no how-to resource help that you could just plug and play. Hope this blog was useful to you and stay tuned for our next blog in this series.

Share artilce:


BLOGS
Data Center

Mastering Data Center Management with Expert Consulting
Aug 14, 2024
—
13 min read
Data Center

Engaging with Data Center Consultants for Optimal Solutions
Aug 14, 2024
—
12 min read
Data Center

Introduction to Data Center Certifications: An Overview
Aug 14, 2024
—
14 min read
Data Center

Mastering Data Center Operations with Advanced Certifications
Aug 14, 2024
—
12 min read
Ready to take your company to the next level?
Unlock your business potential with us
Ready to take your company to the next level?
Unlock your business potential with us
Ready to take your company to the next level?
Unlock your business potential with us
Ready to take your company to the next level?
Unlock your business potential with us

Contact
Email : info@netcon.in
Social


© Copyright 2024 Netcon Technologies. All rights reserved. All logos and trademarks used belong to their respective owners.
Contact
Email : info@netcon.in
Social
© Copyright 2024 Netcon Technologies. All rights reserved. All logos and trademarks used belong to their respective owners.
Contact
Email : info@netcon.in
Social
© Copyright 2024 Netcon Technologies. All rights reserved. All logos and trademarks used belong to their respective owners.
Contact
Email : info@netcon.in
Social
© Copyright 2024 Netcon Technologies. All rights reserved. All logos and trademarks used belong to their respective owners.
Ready to take your company to the next level?
Unlock your business potential with us
Contact
Email : info@netcon.in
Social
© Copyright 2024 Netcon Technologies. All rights reserved. All logos and trademarks used belong to their respective owners.
BLOG
Creating a SiEM Platform
BY
—
4
min read
Creating a SiEM Platform from Scratch using Wazuh-ELK Stack
At Netcon, we constantly experiment with technologies that enhance our security service capabilities to our clients. One of our current experiments is building a Security Information and Event Management (SiEM) platform using Wazuh-ELK stack. Since we were building this from scratch, solutions for challenges we faced were not readily available. In this blog series, we share our experience on the different challenges we faced and how we overcame them.
How to Integrate Fortigate Firewall with Wazuh-EK stack on AWS
One of the primary challenges we faced in our experimentation with Wazuh-ELK stack was while integrating it with the Fortigate Firewall network device. The Wazuh-ELK technology is fairly new in the security industry, and hence not much information is readily available on this specific topic. Considering the cost-efficiency of Wazuh-ELK, it’s only going to increase its popularity. So, someone else will most likely face the same challenges that we did. While the Wazuh community is very supportive in helping with solutions, the information is all over the place. Therefore, we wanted to share this step-by-step process on this topic.
We faced multiple challenges during our experimentation, which included anywhere from simple fixes of editing configuration files to more complex fixes of creating a site-to-site tunnel. The following steps are listed based on the sequence of how we should carry it out to reduce the number of errors and successfully integrate the device.
Step 1: You need to have the right configuration on the ossec.conf file for syslog connection. The location of the file is usually in /var/ossec/etc/ folder. But it could be different based on where you installed it.
In the ossec.conf file, you need to edit the configurations under syslog. This part is for network devices. The configuration should account for the following factors:
514 – This part of the configuration specifies which port receives the logs on the manager’s system. By default, its 514 for syslog.
udp – This part ensures which protocol your firewall logs are being forwarded from. You can have either tcp or udp.
– You need to specify which IPs should be allowed into the Wazuh-manager. By default, it doesn’t have any or even include the tag. You must add the tag and specify the IP.
– You need to add the Wazuh-manager’s IP here.
Here’s the code that you can directly copy-paste into the conf file.
Once you’ve edited the conf file, it should look like the image on right. So, make sure the indenting is right. Now restart the Wazuh-manager.
Okay, now that the Wazuh-manager is setup for receiving the firewall logs, you need to set up the Fortigate firewall to send logs.
Step 2: Change the Settings on the Firewall Device to Forward System Logs
This part is fairly easy for any network devices. Under logging part of the settings, change the logging location to remote. This will give you the option to enter an IP address. Then, make sure you have the following accounted for:
1. Add the Wazuh-manager’s IP to forward the logs.
2.Assign same TCP/UDP configuration as you specified in Step 1; ossc.conf file. If you don’t have an option for it, then it’s most likely UDP. After completing the steps, it should look somewhat like the image on the right.
Step 3: Create a Site-to-site Tunnel
After steps 1 and 2, your logs should be flowing to the Wazuh-manager. The logs are freely flowing through the internet, which is not ideal considering it’s a security tool. Hence, to secure the logs properly, we had to create a site-to-site tunnel.
Note: Site-to-site tunnelling is a private communication channel to ship the logs privately from the device to the manager.
This is the most challenging part of the whole process. You’ll probably face the same challenge if you are hosting it on any cloud server for continued access. We hosted it on AWS, so this step of the blog is specific to AWS. Below are the five steps that we took to successfully complete this device linkage.
3.1. Create a Customer Gateway – Customer gateway is the first step to creating a Site to Site tunnel between your remote networks to cloud. Here, we define the details of which network our Wazuh-manager is connecting to. You can find more details on how to do this at: [AWS.Amazon.com](https://docs.aws.amazon.com/vpn/latest/s2svpn/SetUpVPNConnections.html#vpn-create-cgw).
3.2. Create a Virtual Private Gateway – Next, you need to configure the Target Gateway in AWS. There are two types of Target gateway – Virtual Private Gateway and Transit Gateway. You can find more information on which Gateway you need at: AWS.Amazon.com
3.3. Enable Route Propagation in your Route Table – Now that we have gates on both ends, we need to configure the route table to include the routes used to travel between both gateways. Check out AWS.Amazon.com for more details.
3.4. Create a Site-to-Site VPN Connection – In steps 3.1 to 3.3, we created and configured the necessary components to set-up a site-to-site connection. In this step, we set up the actual tunnel by linking the previous components. Follow the steps from AWS.Amazon.com to suit your requirements. After completing the steps, don’t forget to download the configuration file. This file has the necessary configurations that you need to add to Fortigate.
3.5. Configure Fortigate Firewall with VPN Details – Now that the site-to-site vpn is setup, you need to configure the firewall to match with the configuration file you previously downloaded. This is another challenging step in the whole process due to two main reasons.
The configuration file that we got from AWS in the previous step had 10.0.0.0/18 as the private IP (LAN) segment. You need to correct it with your private IP segment. In addition, the private IP and public IP (WAN) should match in both the configuration files and the Fortigate VPN details. After doing this, check if it looks somewhat like the image on the right.
The AWS default interface is composed of 15 random characters, but Fortigate firewall only supports 12 characters. So, it is better to change the name of the interface to your device name. To do so, in your Fortigate console monitor, find the VPN Monitor section and select Ipsec tunnel. Then, select BringUp and ‘All phase 2 Selectors’. Here, you have the option to change the interface name.
That’s it. The connection is now established. The logs are securely transported from the firewall to Wazuh-manager through the secure tunnel. The logs should be reaching the manager on port 514. You can confirm that by running a tcp dump on the network flow on the manager system.
But don’t celebrate yet, we still have work to do. However, the next few steps are relatively easy.
Step 4: Decoding
Once the logs reach the manager’s system, the Wazuh-manager captures them and saves them into archives before sending them through decoders. The purpose of a decoder is to take the raw logs and convert them into structured information. The Wazuh-manager, unfortunately, was not decoding our logs, despite having a decoder for this in the default decoders folder. After banging our collective heads, we figured that we are better off creating our own.
There are two ways you can write the decoder, but you should use regex (regular expression) for it. One way is to include all regex in one bit of code. Refer to the image.
The other way is to have single sibling for each parameter, also known as sibling decoders. Refer to the image.
The logic of how the decoder works is: When the log reaches the Wazuh-manager, the prematch is what’s used to qualify which decoder will be used for that log. If a log has content that meets the prematch condition, the decoder name is assigned to the log and sent through the rest of the decoder. Each parent pulls its respective data from the log and presents it in the decoded format of the log.
Having multiple parents is a more robust solution than the former one, because in case a log does not contain a data field or the regex does not match a custom field, such as “policy name”, it is unlikely to work.
Step 5: Rulesset
After decoding, ensure the rules trigger the necessary alerts. This is a continuous task, but this is what differentiates a good SiEM tool from an average one. Create new rules so that the manager triggers alerts for new threats.
For that, you need to understand the logic and linkage of rules with the respective decoder. The image on the right shows part of the rules that processes logs from the Fortigate firewall. In the first bit of code, the Fortigate-26 part is the if-condition that links the decoder to these set of rules. If this condition is met, the logs are processed per each rule in the set. If the logs meet the conditions of any one of the rules, an alert is triggered and sent to elasticsearch.
Step 6: Access the Logs on Kibana
As the log alerts are triggered, filebeat picks up the logs and sends it to elasticsearch. Here, ensure the filebeat yml file has the right configuration so that the logs are reaching Kibana. Once the logs reach elasticsearch, you should be able to query it on the Kibana dashboard under ‘discover’ tab using the Wazuh-alerts template.
Fortigate firewall was the first device we attempted to integrate with Wazuh-manager. If you follow the steps in this blog, you’d know by now how challenging it was. Especially, when there is no how-to resource help that you could just plug and play. Hope this blog was useful to you and stay tuned for our next blog in this series.
Written by
Share artilce:
Partner with us
Unlock your business potential with our committed team driving your success.
Read these next
Data Center
Mastering Data Center Management with Expert Consulting
By leveraging the knowledge and experience of seasoned professionals, organizations can transform their data centers from cost centers into strategic assets that drive business growth.
Read now ➝
Data Center
Engaging with Data Center Consultants for Optimal Solutions
From improving energy efficiency and reducing operating costs to enhancing security and planning for future growth, the right consultant can unlock opportunities that drive business value.
Read now ➝
Data Center
Introduction to Data Center Certifications: An Overview
For both data center professionals and the facilities they manage, the lack of industry-recognized certifications can cause a chain reaction of problems. We solve the pain in this blog.
Read now ➝

Contact
Email : info@netcon.in
Social
© Copyright 2024 Netcon Technologies. All rights reserved. All logos and trademarks used belong to their respective owners.
Contact
Email : info@netcon.in
Social
© Copyright 2024 Netcon Technologies. All rights reserved. All logos and trademarks used belong to their respective owners.